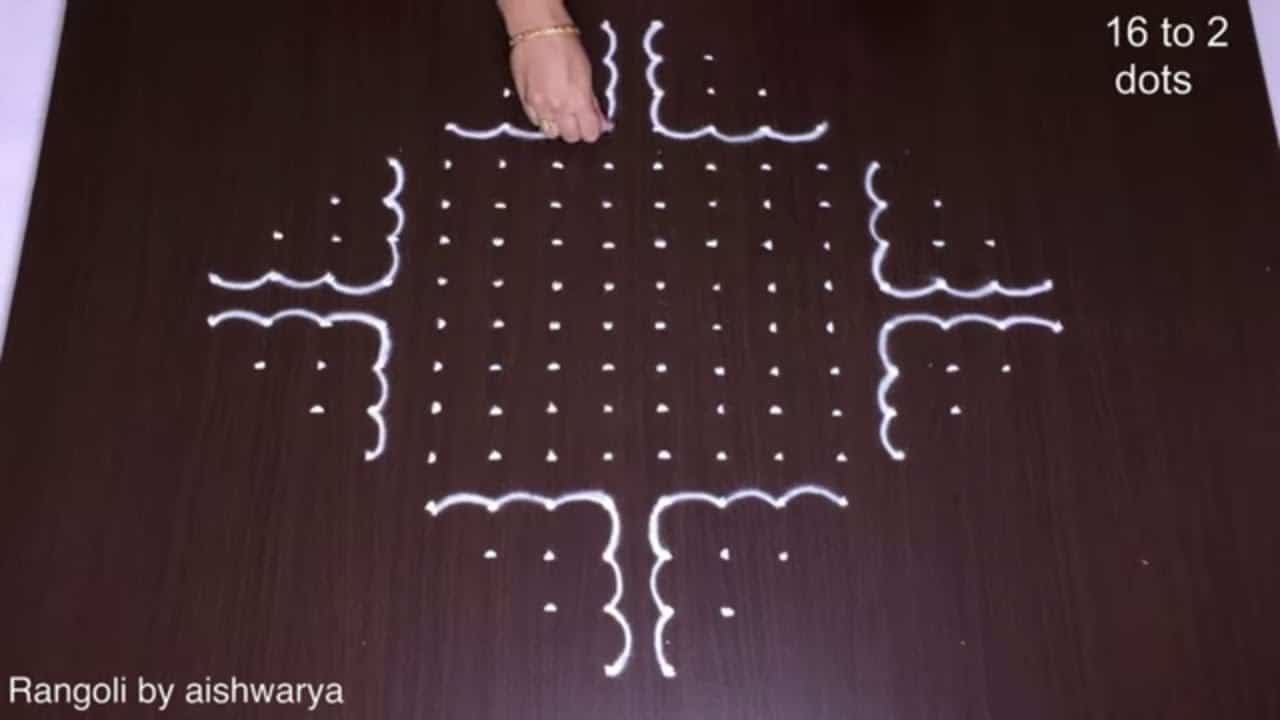
16 To 2 Chukki is the kind of design that looks intricate but is genuinely beginner-friendly once you follow the dot grid.
8 butterflies attractive new year kolam | 16*2*2 chukki kolangal and muggulu designs Thank you so much for watching Channel
My Rangoli Channel Contains : Rangoli Designs Sankranthi Muggulu
Diwali Rangoli Ratham Muggulu Kolam Designs
Muggulu Designs Chukkala Muggulu Easy Rangoli
Simple Rangoli Easy Rangoli Designs Dhanurmasam Muggulu
Melikala Muggulu Geethala Muggulu Sivarathri Muggulu
Tip: Keep your powder bowl close to your dominant hand. Small movements give cleaner curves.
The 16 to 2 chukki kolam is a delightful design celebrated during various festivals, especially for New Year’s. With its intricate butterfly motifs, this kolam captures the essence of renewal and joy. The use of 16 dots arranged in a 2-2 pattern allows for creativity while maintaining simplicity, making it an ideal choice for beginners. This design can be a beautiful addition to your celebrations, similar to the Pandaga Muggulu Beautiful Deepam that brings vibrancy to your festive decor.
Creating a 16 to 2 chukki kolam involves a rhythmic flow of lines and curves, symbolizing harmony and balance. The design’s elegance can be enhanced with the addition of colors, allowing for personal expression. Many artists find inspiration in traditional designs, just as seen in the Sankranthi Pedha Chukkala Muggulu. For those interested in learning more about the art of kolam, you can explore the rich history and significance of these patterns on Wikipedia.
16 To 2 Chukki — Step by Step Guide
Here is how to draw it, line by line. Take your time on the corners and the symmetry will take care of itself.
- Mark the 16-to-2 dot grid.
- Down the centre write the greeting HAPPY NEW YEAR as three stacked words, using the dots to keep the letters aligned.
- Frame the lettering with eight butterfly motifs – a pair across the top, a pair along the bottom, and a pair on each side.
- Give every butterfly two large upper wings and two smaller lower wings meeting at a slim body.
- Decorate the wings with a double outline, rows of dots and small curls, and add two curled antennae.
- Finish the lower edge with a scalloped border line; keep the kolam white.
What You Will Learn
- 16X2X2 Dots Rangoli
- Butterfly Kolam With Dots
- Chukki Kolangal Designs
- 16*2*2 Dots Kolam
- Butterfly Muggulu Designs
- Rangoli With Dots
Frequently Asked Questions
How do I draw this rangoli?
The grid comes first. Use a soft chalk to dot the surface, count twice to confirm the spacing, then start connecting them following the video. Work from the centre outward.
Is this suitable for beginners?
Absolutely. You can pause and rewind the video at every step. The pattern is straightforward once you have the grid down.
What materials do I need?
Just three things: powder (white plus any colours you want), a flat dry surface, and a few minutes of focus. A small bowl per colour helps keep things tidy.
How long does it take?
Plan for roughly 5 min 16 sec to watch and 15 minutes to draw. The second attempt is always cleaner than the first — that is the nature of dot kolam.
Drawing kolam is as much about the practice as the result. Set aside ten minutes, follow the video, and enjoy the process.
Leave a Reply