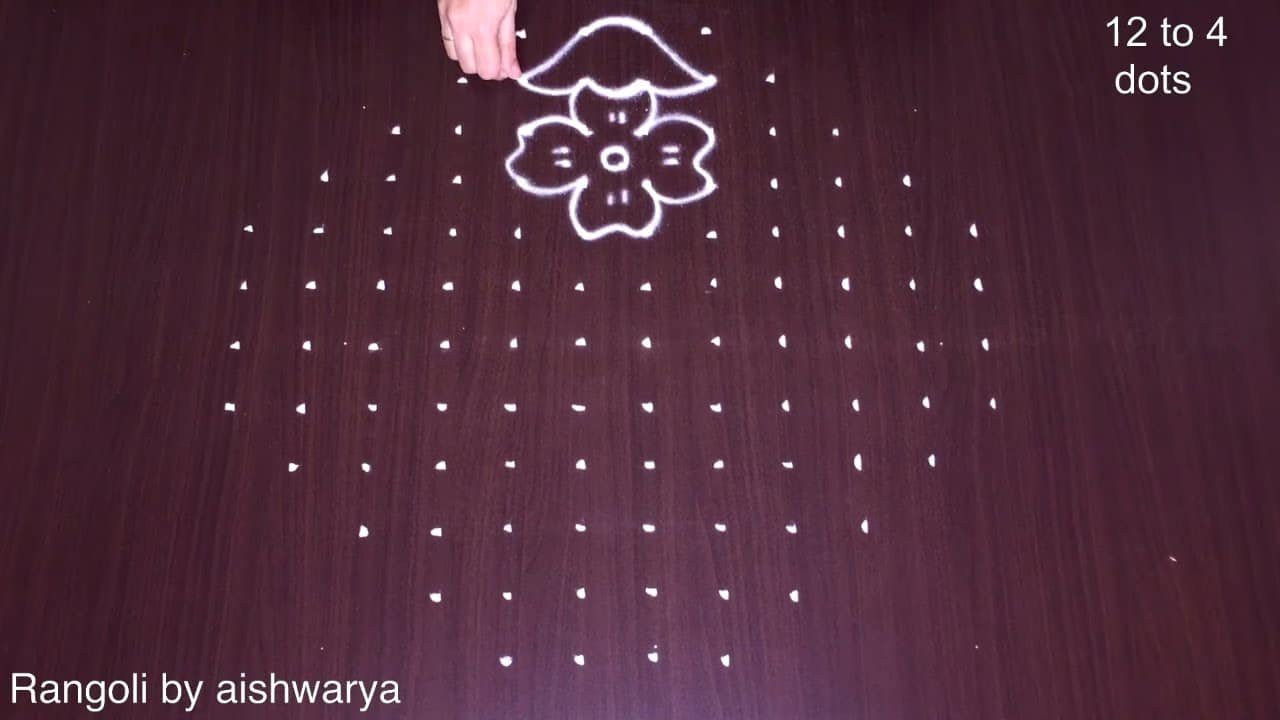
Whether you are decorating for a festival or your daily morning ritual, 12 To 4 Dots is an excellent design to keep handy.
For another beginner-friendly variation, try 8 8 Dots Simple Rangoli Designs.
Learn more about the tradition of Rangoli on Wikipedia.
Learn how to create 12*4*4 Dots Flower Pot Rangoli Poo | Basket Kolam Designs Chukki Kolangal Muggu step by step in this easy tutorial! Perfect for beginners, this simple rangoli with dots uses everyday materials like dry rice flour, colored sand, or vibrant flower petals. Designed by Aishwarya, this kolam pattern is ideal for decorating your living room floor, courtyard, or doorstep. Follow along as we guide you through drawing the lines effortlessly to achieve an awesome rangoli result. Drawing kolam every morning is a cherished Indian tradition that invites positive energy and vibrations into your home. Rangoli, also known as kolam or muggulu (in Andhra Pradesh and Telangana), is a timeless part of Indian culture, handed down through generations. Crafted with kolam powder (muggu pindi or crushed limestone), rice flour, or a blend of both, these designs come in various styles like dots kolam, sikku kolam, padi kolam, and Margazhi kolam. Elevate your celebrations with special festival rangoli! Create deepam kolam for Diwali (Deepavali), large Dhanurmasam muggulu for Sankranthi (Pongal), or intricate patterns for Vijaya Dashami (Dasara). It's believed that drawing muggulu at your doorstep brings good luck and prosperity to your family. Enhance your designs with fresh flowers for any occasion. For more #simplerangolidesigns freehand and dotted rangoli tutorials, including creative kolam ideas for all skill levels. Watch now and master beautiful rangoli designs today! My Simple Rangoli Designs Channel Contains :
1. Rangoli 2. Muggulu 3. Rangoli Designs
4. Kolam 5. Simple Rangoli 6. Chukkala Muggulu
7. Simple Rangoli Designs 8. Muggulu Designs 9. Kolam Designs
10. Sankranthi Muggulu 11. Rangoli Design 12. Tipkyanchi Rangoli
13. Pongal Kolam 14. New Year Muggulu 15. Kolangal
Tip: Practice on paper first if you are new to dot kolam. The grid is the same; only the surface changes.
About this design: 12 To 4 Dots is a beginner-friendly pattern that comes together in just a few minutes. Once you have practised the 12 to 4 dots dot grid, you can scale it up for festival mornings or scale it down for a daily doorstep. Many learners on our channel make this 12 to 4 dots their go-to design once they get the rhythm of the curves.
12 To 4 Dots — Step by Step Guide
The video above shows the full sequence; the steps below summarise each stage so you can glance back as you draw.
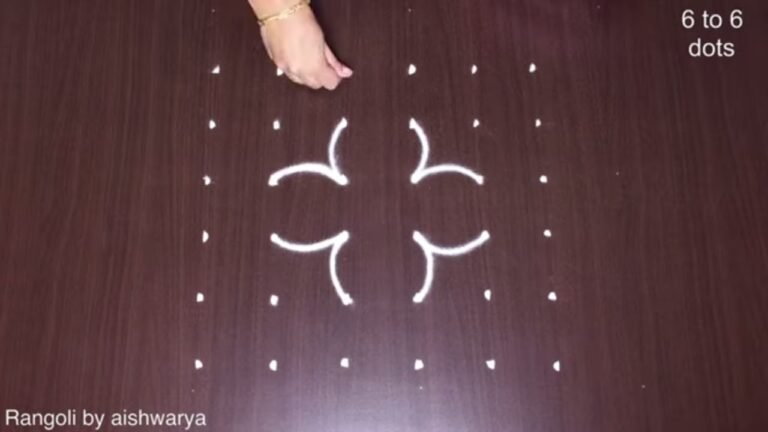
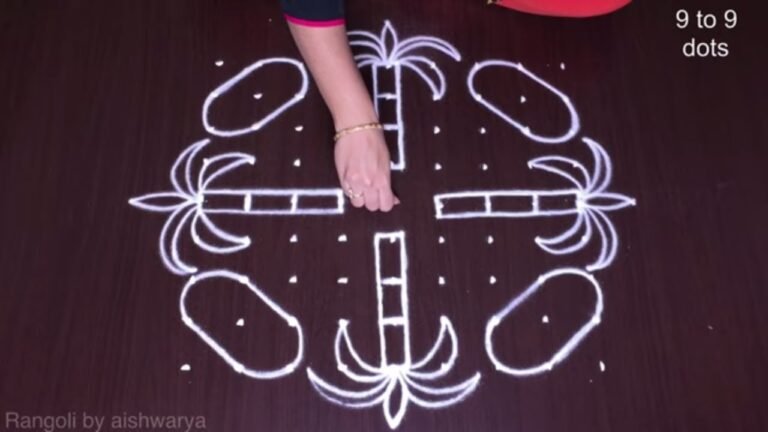
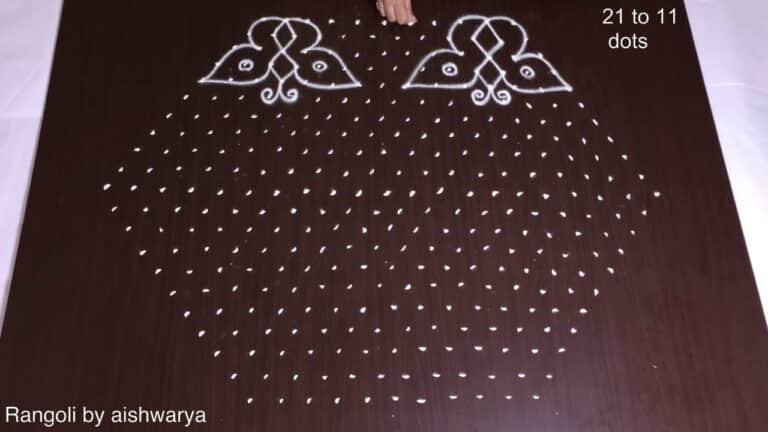
- Mark a 12-to-4 dot grid (12 dots in the centre row tapering to 4).
- In the centre, draw a flower with a coiled-spiral eye and five rounded petals, boxed inside a small square.
- Around the centre, draw four more spiral-centred five-petal flowers at the top, bottom, left and right.
- At the two top corners, draw flower-pots: a rounded pot body filled with net (cross-hatch) lines, each with a leafy plant rising out of it.
- At the bottom centre, draw a small pot (paanai) with two curled handles and a bloom on top.
- Fill the remaining gaps with pointed veined leaves and S-curl tendrils to link all the motifs together.
What You Will Learn
- 12X4X4 Dots Rangoli
- Flower Pot Rangoli With Dots
- Basket Kolam Designs
- Chukki Kolangal Muggu
- 12X4X4 Dots Kolam
- Poo Kolam With Dots
Frequently Asked Questions
How do I draw this rangoli?
Start by marking an even dot grid on a flat, clean surface. Once the grid is in place, connect the dots following the curves shown in the video. Even spacing between dots is the single biggest factor for a clean finish.
Is this suitable for beginners?
Yes, and it is one we recommend to first-timers. The small grid keeps the design manageable while still teaching the core technique.
What materials do I need?
You will need rice flour or rangoli powder (white, plus your choice of colours), a flat surface like a clean floor or courtyard, and optionally a dot stencil if you are new to grid-drawing.
How long does it take?
You will see a 8 min 25 sec walkthrough above. Drawing it yourself is usually a 12–18 minute affair, slightly slower the first time.
Roll up your sleeves, grab a handful of rice flour, and give this design ten quiet minutes. The result is worth the small effort.
Leave a Reply