Amazing Shanku Kolam combines tradition with simplicity, making it one of the most rewarding designs to practice at home.
For another beginner-friendly variation, try Sankranthi Special Bhogi Kundala Muggulu.
Learn more about the tradition of Rangoli on Wikipedia.
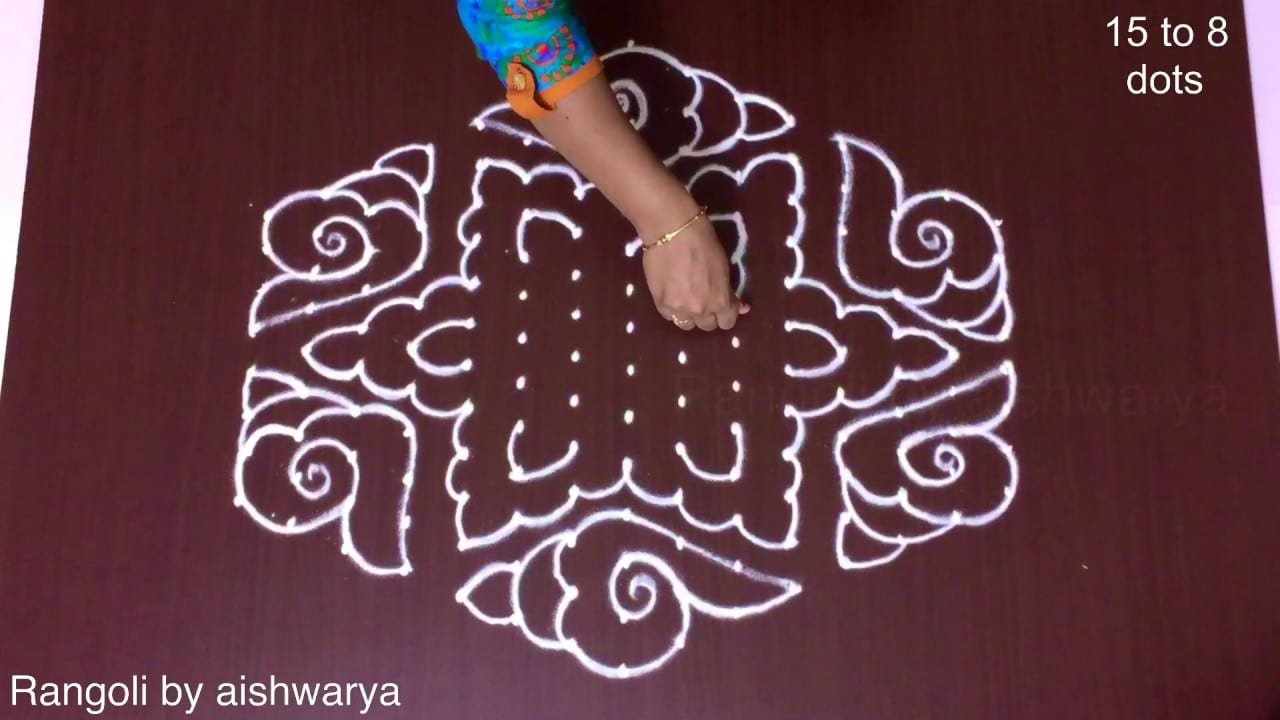
Looking for a sacred and elegant Shanku kolam for Friday? This 15 by 8 dots rangoli is devotional, grand, and beautifully structured. In this video, I guide you step by step to create a 15×8 straight dot grid Shanku kolam specially designed for Friday decoration. The large rectangular layout provides strong symmetry and balance, while the conch shape gives the kolam a traditional and auspicious appearance.
We begin by placing a neat 15 by 8 straight dot structure, carefully aligned to maintain proportion and spacing. Then, the Shanku outline is formed by smoothly connecting the dots into graceful curved lines. Inner detailing enhances the sacred conch structure and gives the kolam a refined and complete finish. Even though the grid is large, the method keeps it easy and manageable. How to construct a proper 15–8 straight dot grid How to create a balanced Shanku pattern using dots
How to maintain symmetry in large kolams Tips to make Friday kolam neat and devotional This Shanku muggulu is ideal for Friday pooja spaces, temple entrances, and spacious verandas. The structured grid ensures a clean and impressive result suitable for devotional occasions.
Watch till the end to see the full transformation from simple dots to a complete Shanku kolam — the final reveal highlights a beautifully balanced and sacred design. If you enjoy grand dot kolams, explore more 15 by 8 dots rangoli, Friday special muggulu, and traditional sacred patterns on the channel.
Tip: Use chalk to lightly mark your dot grid first — it wipes away cleanly once your rangoli is finished.
About this design: Amazing Shanku Kolam is a beginner-friendly pattern that comes together in just a few minutes. Once you have practised the amazing shanku kolam dot grid, you can scale it up for festival mornings or scale it down for a daily doorstep. Many learners on our channel make this amazing shanku kolam their go-to design once they get the rhythm of the curves.
Amazing Shanku Kolam — Step by Step Guide
Below is the step-by-step breakdown. The video covers the same sequence in real time.
- Clear a flat surface and set down your dot grid using rice flour or chalk.
- Confirm the dot spacing is even — uneven dots are the biggest cause of wobbly curves.
- Begin tracing from the centre outward, following the curves shown in the video above.
- Fill the petals and sections with your chosen colours, working one area at a time.
- Finish the edges with a fine line for a sharp, photograph-ready result.
What You Will Learn
- Friday Shanku Kolam 15 By 8 Dots
- 15 By 8 Dots Shanku Rangoli
- Shanku Muggulu 15 8 Design
- Friday Special Dot Kolam
- 15 8 Chukkala Muggulu
- Straight Dot Grid Conch Kolam
Frequently Asked Questions
How do I draw this rangoli?
Set down the dot grid in pencil or chalk, then follow the loops one petal at a time. If a curve goes off, wipe it and retry — kolam is forgiving.
Is this suitable for beginners?
It is one of the more forgiving designs in our collection. Beginners often pick it as a confidence-builder before moving on to larger grids.
What materials do I need?
You will need rice flour or rangoli powder (white, plus your choice of colours), a flat surface like a clean floor or courtyard, and optionally a dot stencil if you are new to grid-drawing.
How long does it take?
The video runs 2 min 56 sec. In practice, most learners take between 10 and 20 minutes — a little longer the first time, faster as the pattern becomes familiar.
After you draw this, take a picture before the day blows it away. Kolam is impermanent by design, but a photo lets you revisit the version you drew.

Leave a Reply