Daily Purpose Diya Kolam combines tradition with simplicity, making it one of the most rewarding designs to practice at home.
Daily purpose diya kolam designs | Simple and easy deepam muggulu Festival rangoli. This tutorial will show you how to draw Beautiful Indian traditional art Diwali Rangoli patterns using materials such as dry rice flour, colored sand or flower petals Rangoli designs by Aishwarya. Simple rangoli Kutti Kolam pattern is created on the floor in living rooms or courtyards. Draw the Lines step by step as it is shown in this video and will be awesome Rangoli Design. 😲 The Diwali rangoli pattern here is one of the amazing latest kolam designs. Simple Rangoli Designs and easy rangoli designs by Aishwarya with dots for beginners and intermediate.
1. Diwali Rangoli 2. Pongal kolams 3. Easy rangoli designs
4. Rangoli design 5. Chukkala muggulu 6. Dot rangoli designs
7. Dots rangoli 8. Easy rangoli 9. Easy rangoli designs
10. Kolam designs 11. Kolam with dots 12. Muggulu designs
13. Muggulu designs with dots 14. Small rangoli designs 15. Muggulu chukkala muggulu
Tip: Keep your powder bowl close to your dominant hand. Small movements give cleaner curves.
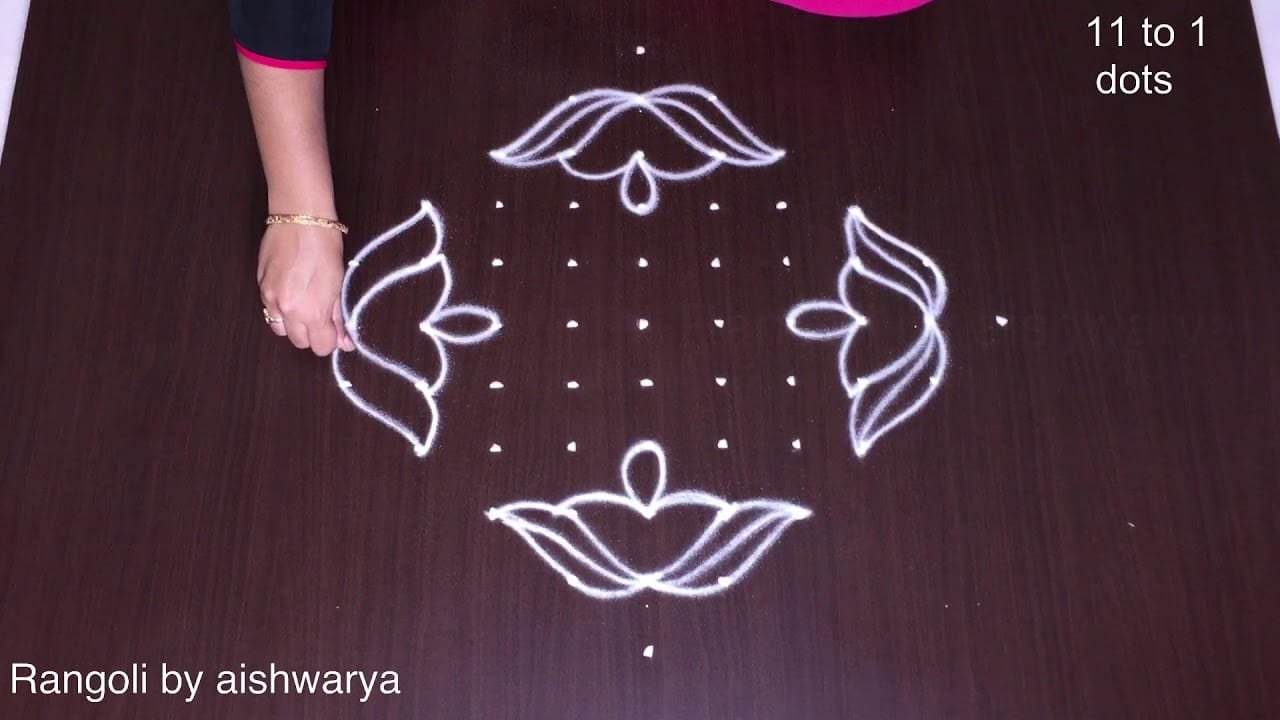
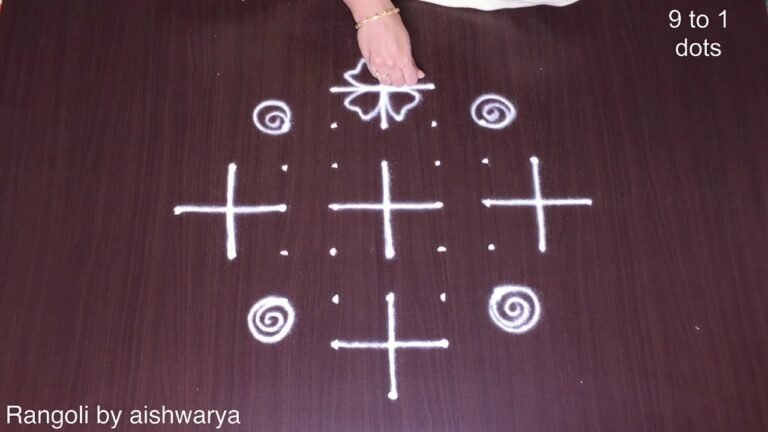
The daily purpose diya kolam, designed with 11 to 1 dots, is a beautiful expression of traditional Indian art that can enhance any space. This simple yet elegant kolam is particularly popular during festivals like Diwali, where it serves as a warm welcome to guests and deities alike. The use of rice flour, colored sand, or flower petals offers endless opportunities for creativity, making it suitable for both beginners and seasoned artists. For more inspiration, you can explore this Big Dot Rangoli Muggulu design.
This kolam design is characterized by its symmetrical patterns and the incorporation of diya motifs, which symbolize light and prosperity. The daily purpose diya kolam not only beautifies homes but also promotes a sense of togetherness during festive occasions. Its step-by-step creation process is easy to follow, making it accessible for everyone who wishes to engage in this cultural practice. If you are interested in more variations, check out this Attractive Simple Kolam Design. For a deeper understanding of rangoli, visit this page.
Daily Purpose Diya Kolam — Step by Step Guide
Each step takes only a moment. The whole design comes together in just a few minutes once the grid is in place.
- Clear a flat surface and set down your dot grid using rice flour or chalk.
- Confirm the dot spacing is even — uneven dots are the biggest cause of wobbly curves.
- Begin tracing from the centre outward, following the curves shown in the video above.
- Fill the petals and sections with your chosen colours, working one area at a time.
- Finish the edges with a fine line for a sharp, photograph-ready result.
What You Will Learn
- Simple Rangoli Designs
- Rangoli
- Muggulu
- Rangoli Designs
- Rangoli Kolam
- Kolam
Frequently Asked Questions
How do I draw this rangoli?
The grid comes first. Use a soft chalk to dot the surface, count twice to confirm the spacing, then start connecting them following the video. Work from the centre outward.
Is this suitable for beginners?
Yes, and it is one we recommend to first-timers. The small grid keeps the design manageable while still teaching the core technique.
What materials do I need?
Just three things: powder (white plus any colours you want), a flat dry surface, and a few minutes of focus. A small bowl per colour helps keep things tidy.
How long does it take?
A 3 min 25 sec video shows the complete sequence. On paper or floor, expect to spend around a quarter of an hour from grid to finished pattern.
We rotate festival designs through the year — bookmark the homepage and you will find a new pattern every morning.
Leave a Reply