If you enjoy dot-grid muggulu, Sankranthi Bhogi Kundala Muggulu is a satisfying pattern that comes together in just a few minutes.

For another beginner-friendly variation, try 7 To 4 Diya Kolam For Pooja Room At Home.
Learn more about the tradition of Rangoli on Wikipedia.
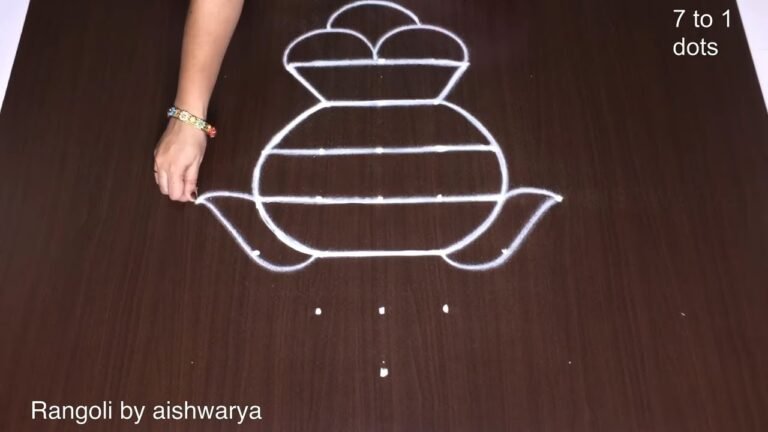
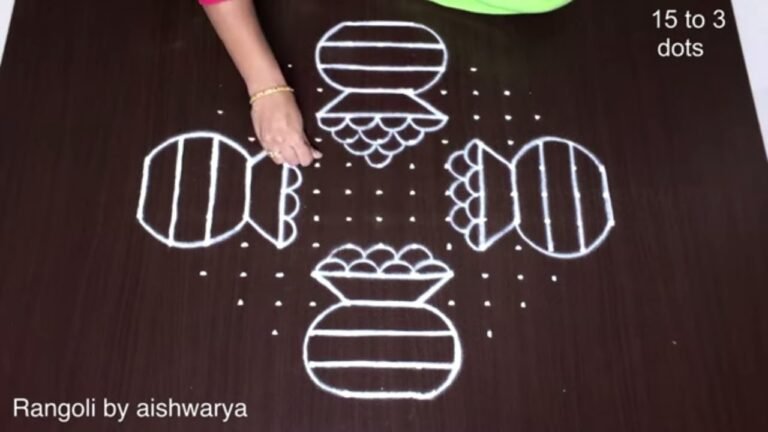
Looking for a festive Pongal paanai rangoli using a clean 6×6 dot grid? This Sankranthi Bhogi special kolam design beautifully captures the harvest spirit. In this video, we create a 6×6 dots Pongal paanai rangoli, structured on a balanced square grid. The 6 into 6 dot format gives strong symmetry while allowing enough space to shape the traditional pot motif clearly and neatly.
🌾 What You’ll Learn Step by Step: Proper placement of the 6×6 dot grid Forming the Pongal paanai shape with smooth curves
Maintaining symmetry across the design Simple finishing touches to enhance the festive appearance Pongal and Sankranthi celebrations are closely associated with the decorated pot symbolizing prosperity and abundance. Drawing a paanai-themed kolam at the entrance reflects gratitude and joy during Bhogi and the harvest season.
The 6×6 grid makes this design suitable for medium entrances, courtyards, and apartment thresholds. Even beginners can confidently follow the dot structure and recreate the pot shape with balance and clarity. Watch till the end to see the complete symmetrical reveal — the final alignment highlights how structured dots transform into a meaningful festive kolam. If you enjoy 6×6 themed rangoli, explore other Sankranthi grids like 7-1 and 9-5 to expand your seasonal dot-series collection.
Save this design and recreate it for your Pongal and Bhogi celebrations.
Tip: Use chalk to lightly mark your dot grid first — it wipes away cleanly once your rangoli is finished.
This design belongs to the broader tradition of rangoli and kolam art practised across South India. Explore more in our 6 to 6 dots Rangoli Designs collection.
About this design: Sankranthi Bhogi Kundala Muggulu is a beginner-friendly pattern that comes together in just a few minutes. Once you have practised the sankranthi bhogi kundala muggulu dot grid, you can scale it up for festival mornings or scale it down for a daily doorstep. Many learners on our channel make this sankranthi bhogi kundala muggulu their go-to design once they get the rhythm of the curves.
Sankranthi Bhogi Kundala Muggulu — Step by Step Guide
If you have drawn dot rangoli before, this will feel familiar. If you have not, the dot grid will guide you.
- Mark the dot grid.
- In the centre draw a small four-petal flower set inside a diamond (a square standing on its point).
- Around the centre draw four ribbed coil shapes (the kundalu) – flattened barrel forms filled with parallel lines – arranged like the arms of a pinwheel so they seem to spin around the middle.
- At each of the four corners draw a lotus bud – a cluster of pointed petals opening outward.
- Add a curled spiral scroll at the base of each corner bud and small curls linking the coils, so all the motifs join into one round mandala.
- Trace the whole muggu in plain white powder.
What You Will Learn
- 6X6 Dots Pongal Paanai Rangoli
- Sankranthi Bhogi Muggulu 6X6
- Pongal Pot Kolam With Dots
- 6-6 Dots Rangoli Design
- Harvest Festival Kolam 6X6
- 6X6 Pulli Kolam
Frequently Asked Questions
How do I draw this rangoli?
Start by marking an even dot grid on a flat, clean surface. Once the grid is in place, connect the dots following the curves shown in the video. Even spacing between dots is the single biggest factor for a clean finish.
Is this suitable for beginners?
Beginner-friendly is exactly the right description. The video walks through every line clearly and you can match the pace.
What materials do I need?
White rice flour for the outline, coloured powders for the fill, and a clean dry floor. That is the essentials list — you can add a stencil if you prefer.
How long does it take?
You will see a 3 min 6 sec walkthrough above. Drawing it yourself is usually a 12–18 minute affair, slightly slower the first time.
A reminder that beautiful art does not need expensive materials — just a steady hand, a clean surface, and a few pinches of rice flour.

Leave a Reply