This traditional sankranthi 5×5 pongal tutorial walks you through every step from the dot grid to the final pattern.

Drawing Rangoli 19 is a relaxing, almost meditative practice. The dots guide your hand and the design unfolds naturally.
Creating Traditional Sankranthi Muggulu 5×5 Designs
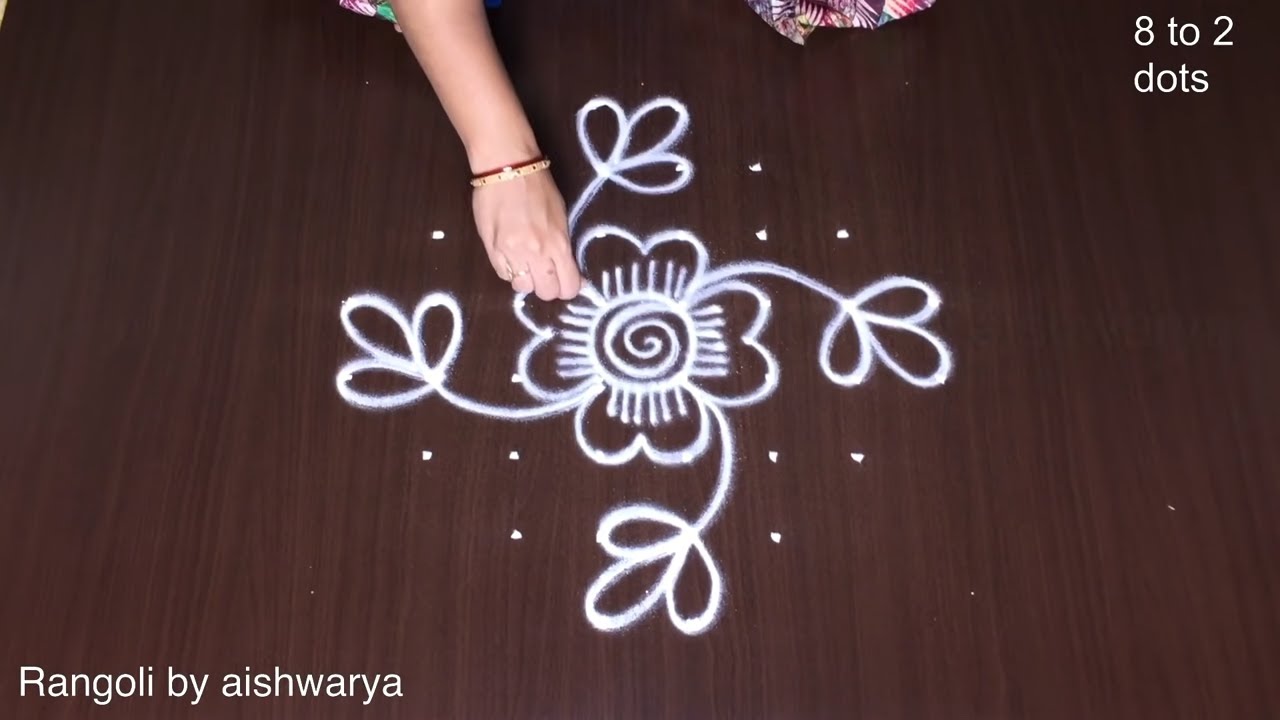
Traditional Sankranthi Muggulu 5×5 designs are a beautiful way to celebrate Pongal, showcasing intricate patterns that enhance the festive spirit. These designs typically use five dots arranged in a square grid, allowing for a variety of creative patterns. To create your own, you'll need colored powders, rice flour, and a steady hand. As you draw, keep in mind that traditional sankranthi muggulu 5×5 designs symbolize prosperity and happiness, making them a perfect addition to your home during the celebrations.
Looking for beautiful Traditional Sankranthi Muggulu with 5×5 dots? This simple Pongal kolam design is perfect for festive entrances and traditional decoration. In this video, I guide you step by step to create a neat 5×5 dots rangoli design inspired by classic Sankranthi muggulu and Pongal kolam patterns. If you enjoy traditional rangoli with dots, this tutorial will help you draw smooth curves and maintain symmetry.
We begin by placing the 5×5 dot grid clearly to build a strong base. Then the curved framework develops gradually into a graceful and balanced traditional kolam design. The square layout makes it easy to follow and beginner-friendly. How to construct a proper 5×5 dots kolam grid How to create neat Sankranthi muggulu designs
How to draw elegant Pongal kolam patterns How to design symmetrical rangoli with dots This design works beautifully as a Sankranthi entrance rangoli and is ideal for doorways, courtyards, and festive decoration. Even with a simple dot grid, the final kolam looks rich and traditional.
If you enjoy chukkala muggulu designs, festive rangoli designs with dots, and elegant kolam patterns, this tutorial will help you improve your rangoli drawing skills. Watch till the end to see how the 5×5 dots grid transforms into a beautiful traditional Pongal kolam.
Tip: A slightly damp brush along the edges gives a sharper finish, especially for festival photographs.
This traditional Sankranthi muggulu design, featuring a 5×5 dot grid, is a delightful representation of festive creativity. The design’s simplicity makes it accessible for beginners, while still allowing for intricate detailing that brings a warm charm to any home. As you follow the step-by-step process, you’ll find that creating a symmetrical and elegant kolam is a rewarding experience. This design is particularly suited for festive occasions like Pongal, where it can adorn doorways and courtyards, welcoming guests with its beauty. For more inspiration, check out our Chukkala Muggulu for Sankranthi post.
The 5×5 dots provide a strong foundation for developing graceful curves and patterns, characteristic of traditional kolam art. As you work through this design, you’ll appreciate the balance and harmony that emerge from meticulous dot placement. This kolam is not only a feast for the eyes but also a wonderful way to embrace cultural traditions. If you’re looking to explore more floral patterns, consider our Latest Flower Rangoli Designs for additional ideas. To learn more about rangoli and its significance in Indian culture, visit this link.
About this design: Traditional Sankranthi Muggulu 5X5 is a beginner-friendly pattern that comes together in just a few minutes. Once you have practised the traditional sankranthi muggulu 5×5 dot grid, you can scale it up for festival mornings or scale it down for a daily doorstep. Many learners on our channel make this traditional sankranthi muggulu 5×5 their go-to design once they get the rhythm of the curves.
Traditional Sankranthi 5X5 Pongal — Step by Step Guide
Each step takes only a moment. The whole design comes together in just a few minutes once the grid is in place.
- Clear a flat surface and set down your dot grid using rice flour or chalk.
- Confirm the dot spacing is even — uneven dots are the biggest cause of wobbly curves.
- Begin tracing from the centre outward, following the curves shown in the video above.
- Fill the petals and sections with your chosen colours, working one area at a time.
- Finish the edges with a fine line for a sharp, photograph-ready result.
What You Will Learn
- Rangoli
- Muggulu
- Rangoli Designs
- Kolam
- Chukkala Muggulu
- Simple Rangoli
Frequently Asked Questions
How do I draw this rangoli?
The grid comes first. Use a soft chalk to dot the surface, count twice to confirm the spacing, then start connecting them following the video. Work from the centre outward.
Is this suitable for beginners?
Absolutely. You can pause and rewind the video at every step. The pattern is straightforward once you have the grid down.
What materials do I need?
Rice flour, coloured rangoli powders, and a clean stretch of floor or paper. Some draw with chalk first to set the grid before powdering over it.
How long does it take?
The full demonstration takes 2 min 55 sec. Most people find their own drawing time settles to about 15 minutes once the grid is familiar.
Pin this for later or share with a friend learning kolam — and let us know in the comments which design you would like next.


Leave a Reply