10 2 Margazhi Madham New is a beautiful kolam pattern you can draw right at your doorstep — perfect for beginners and seasoned rangoli artists alike.
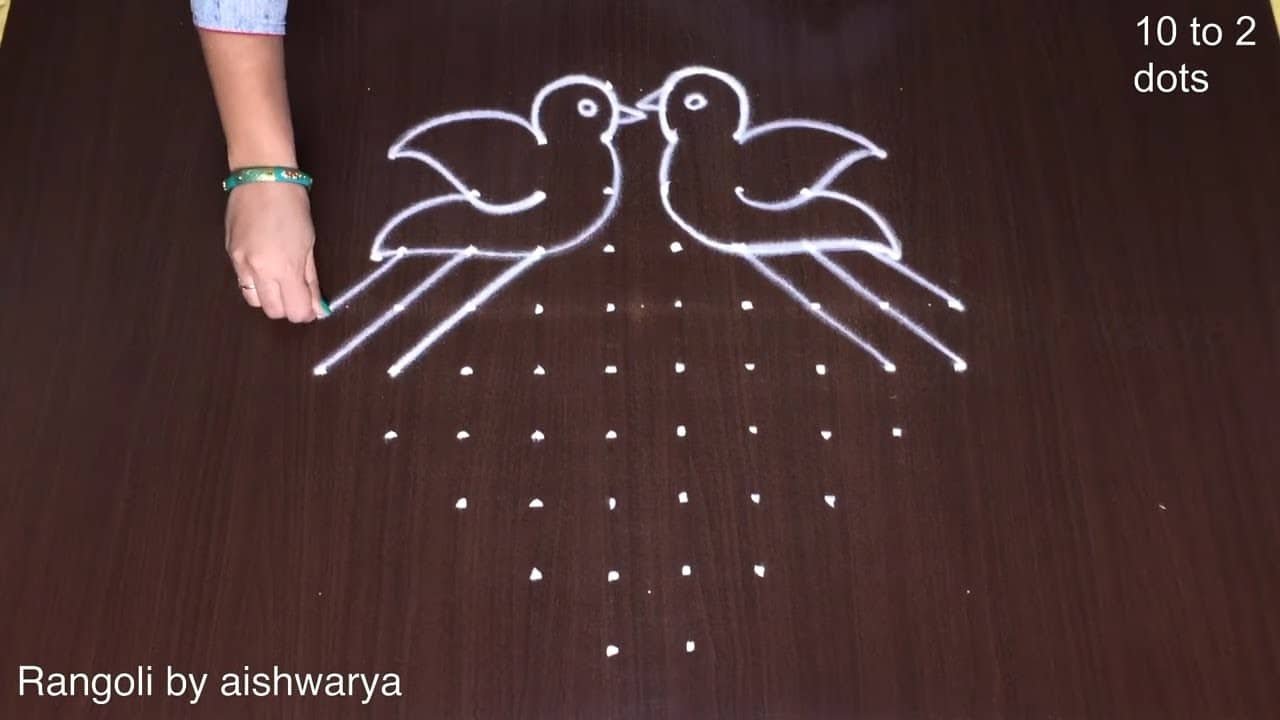
10×2 Margazhi Madham New Year Birds Rangoli | Simple Rangolis for Festival | Latest Muggulu Thank you so much for watching Channel
My Rangoli Channel Contains : Rangoli Designs Sankranthi Muggulu
Diwali Rangoli Ratham Muggulu Kolam Designs
Muggulu Designs Chukkala Muggulu Easy Rangoli
Simple Rangoli Easy Rangoli Designs Dhanurmasam Muggulu
Melikala Muggulu Geethala Muggulu Sivarathri Muggulu
Tip: Practice on paper first if you are new to dot kolam. The grid is the same; only the surface changes.
The 10×2 Margazhi Madham New Year Kolam is a delightful design that captures the essence of celebration during the Margazhi season. Typically featuring a grid of 10 rows and 2 columns, this kolam often incorporates motifs of birds and nature, symbolizing new beginnings and prosperity. It is a perfect way to welcome the New Year, reflecting the joy of the festival. For those interested in exploring similar designs, check out this Happy New Year 21 To 11 Beautiful Rangoli collection.
This design not only serves as an artistic expression but also connects deeply with cultural traditions. Easy to create, it involves using rice flour or chalk powder, which are both eco-friendly materials. As you practice this kolam, you might also enjoy the creativity found in Pongal Panaai Kolam Designs, which share a similar festive spirit. To learn more about the rich history and variety of rangoli, you can visit this informative page.
About this design: 10X2 Margazhi Madham New is a beginner-friendly pattern that comes together in just a few minutes. Once you have practised the 10×2 margazhi madham new dot grid, you can scale it up for festival mornings or scale it down for a daily doorstep. Many learners on our channel make this 10×2 margazhi madham new their go-to design once they get the rhythm of the curves.
10X2 Margazhi Madham New — Step by Step Guide
Below is the step-by-step breakdown. The video covers the same sequence in real time.
- Clear a flat surface and set down your dot grid using rice flour or chalk.
- Confirm the dot spacing is even — uneven dots are the biggest cause of wobbly curves.
- Begin tracing from the centre outward, following the curves shown in the video above.
- Fill the petals and sections with your chosen colours, working one area at a time.
- Finish the edges with a fine line for a sharp, photograph-ready result.
What You Will Learn
- Simple Rangoli Designs
- Rangoli
- Muggulu
- Rangoli Designs
- Rangoli Kolam
- Kolam
Frequently Asked Questions
How do I draw this rangoli?
Begin with the dot grid — this is the skeleton of the design. With rice flour or chalk, place each dot at equal intervals. Then trace the curves slowly, one section at a time.
Is this suitable for beginners?
Beginner-friendly is exactly the right description. The video walks through every line clearly and you can match the pace.
What materials do I need?
Rice flour, coloured rangoli powders, and a clean stretch of floor or paper. Some draw with chalk first to set the grid before powdering over it.
How long does it take?
The tutorial is 2 min 56 sec long. With practice the actual drawing settles around 10 minutes; the first time will likely take twice that.
Beginners often ask which design to start with. Honestly, this one. It is small enough to finish in a sitting and the curves teach you the basics of dot kolam.
Leave a Reply