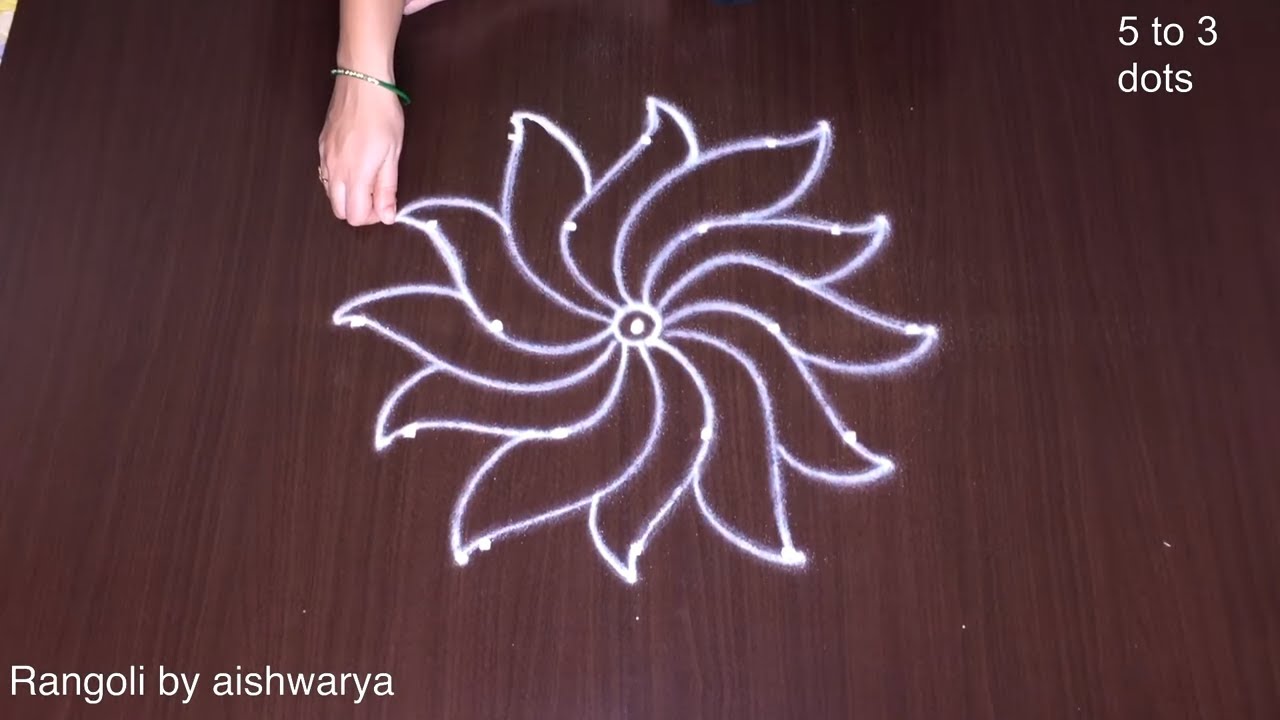
There is something timeless about 5 Into 3 Middle — the symmetry, the rhythm of the dots, and the soft curves it produces.

Different style and easy muggulu designs new | Model simple kolam 5 into 3 middle dots rangoli. This tutorial will show you how to draw Beautiful Indian traditional art Diwali Rangoli patterns using materials such as dry rice flour, colored sand or flower petals Rangoli designs by Aishwarya. Simple rangoli Kutti Kolam pattern is created on the floor in living rooms or courtyards. Draw the Lines step by step as it is shown in this video and will be awesome Rangoli Design. 😲 The Diwali rangoli pattern here is one of the amazing latest kolam designs. Simple Rangoli Designs and easy rangoli designs by Aishwarya with dots for beginners and intermediate.
1. Diwali Rangoli 2. Pongal kolams 3. Easy rangoli designs
4. Rangoli design 5. Chukkala muggulu 6. Dot rangoli designs
7. Dots rangoli 8. Easy rangoli 9. Easy rangoli designs
10. Kolam designs 11. Kolam with dots 12. Muggulu designs
13. Muggulu designs with dots 14. Small rangoli designs 15. Muggulu chukkala muggulu
Tip: Keep your powder bowl close to your dominant hand. Small movements give cleaner curves.
This design belongs to the broader tradition of rangoli and kolam art practised across South India. Explore more in our 5 to 3 dots Rangoli Designs collection.
The 5 into 3 middle dots rangoli design is a charming and manageable pattern that beautifully embodies the essence of traditional kolam art. Perfect for festivals like Diwali, this design uses a simple dot grid structure to create intricate designs that can brighten any space. Beginners can easily follow a step-by-step approach to recreate this pattern, allowing for a sense of accomplishment as they develop their skills. For those interested in exploring similar designs, consider checking out Sankranthi Pedha Chukkala Muggulu for more inspiration.
This design not only serves as an aesthetic centerpiece for celebrations but also represents a cultural practice that brings families together. Utilizing materials such as rice flour or colored powders, each design can be personalized to reflect individual creativity. As you learn this specific pattern, you may also want to explore other easy rangoli designs that fit various occasions, including Pandaga Muggulu Beautiful Deepam. For more information on the significance and techniques of rangoli, you can visit this Wikipedia page.
5 Into 3 Middle — Step by Step Guide
Below is the step-by-step breakdown. The video covers the same sequence in real time.
- Clear a flat surface and set down your dot grid using rice flour or chalk.
- Confirm the dot spacing is even — uneven dots are the biggest cause of wobbly curves.
- Begin tracing from the centre outward, following the curves shown in the video above.
- Fill the petals and sections with your chosen colours, working one area at a time.
- Finish the edges with a fine line for a sharp, photograph-ready result.
What You Will Learn
- Simple Rangoli Designs
- Rangoli
- Muggulu
- Rangoli Designs
- Rangoli Kolam
- Kolam
Frequently Asked Questions
How do I draw this rangoli?
Set down the dot grid in pencil or chalk, then follow the loops one petal at a time. If a curve goes off, wipe it and retry — kolam is forgiving.
Is this suitable for beginners?
Yes — this design is shaped specifically with newcomers in mind. The dot grid is small enough to manage, and the curves are gentle. Most learners get it right by the second try.
What materials do I need?
White rice flour for the outline, coloured powders for the fill, and a clean dry floor. That is the essentials list — you can add a stencil if you prefer.
How long does it take?
Roughly 3 min 20 sec to watch end-to-end, and 10–20 minutes to draw yourself depending on grid size and how careful you are with the curves.
After you draw this, take a picture before the day blows it away. Kolam is impermanent by design, but a photo lets you revisit the version you drew.


Leave a Reply