Looking to learn Simple 10-2 Dots Rangoli? This step-by-step guide walks you through every line, dot, and curve.
For another beginner-friendly variation, try Happy Pongal Kolam.
Learn more about the tradition of Rangoli on Wikipedia.
Looking for a beautiful and simple 10 to 2 dots rangoli design? This elegant pattern is perfect for small entrances and festive decoration. In this video, I show you step by step how to draw a neat and symmetrical 10-2 dots rangoli using a decreasing dot grid. If you enjoy structured rangoli designs 10 to 2, this tutorial will help you understand alignment, spacing, and smooth curve formation.
We begin by placing the clear 10 to 2 kolam dot structure carefully to form a strong base. Then, the outer curves are developed gradually to transform the grid into a balanced design. This method makes it easy to create clean and traditional 10 to 2 muggulu without confusion. How to construct a proper 10 to 2 dots rangoli grid How to maintain symmetry in 10-2 kolams
How to refine curves for 10 dots rangoli easy patterns How to enhance compact layouts into elegant 10 chukkala muggulu This design is ideal for those searching for rangoli with dots 10-2 or classic 10 dots muggulu. Because of its size, it works beautifully as a compact entrance design and also fits under small dot rangoli designs for apartments and pooja areas.
You can even adapt this structure into easy flower muggulu by adding floral curves inside the framework. Many traditional flower kolam patterns simple follow the same 10–2 decreasing dot method. Watch till the end to see how the complete 10 to 2 rangoli transforms from a simple grid into a graceful and balanced kolam. If you enjoyed this tutorial, explore more rangoli designs with dots 10-2 and creative dot kolam patterns on the channel.
Tip: Practice on paper first if you are new to dot kolam. The grid is the same; only the surface changes.
About this design: Simple 10-2 Dots Rangoli is a beginner-friendly pattern that comes together in just a few minutes. Once you have practised the simple 10-2 dots rangoli dot grid, you can scale it up for festival mornings or scale it down for a daily doorstep. Many learners on our channel make this simple 10-2 dots rangoli their go-to design once they get the rhythm of the curves.
Simple 10-2 Dots Rangoli — Step by Step Guide
Pace yourself through the steps — kolam rewards patience more than speed.
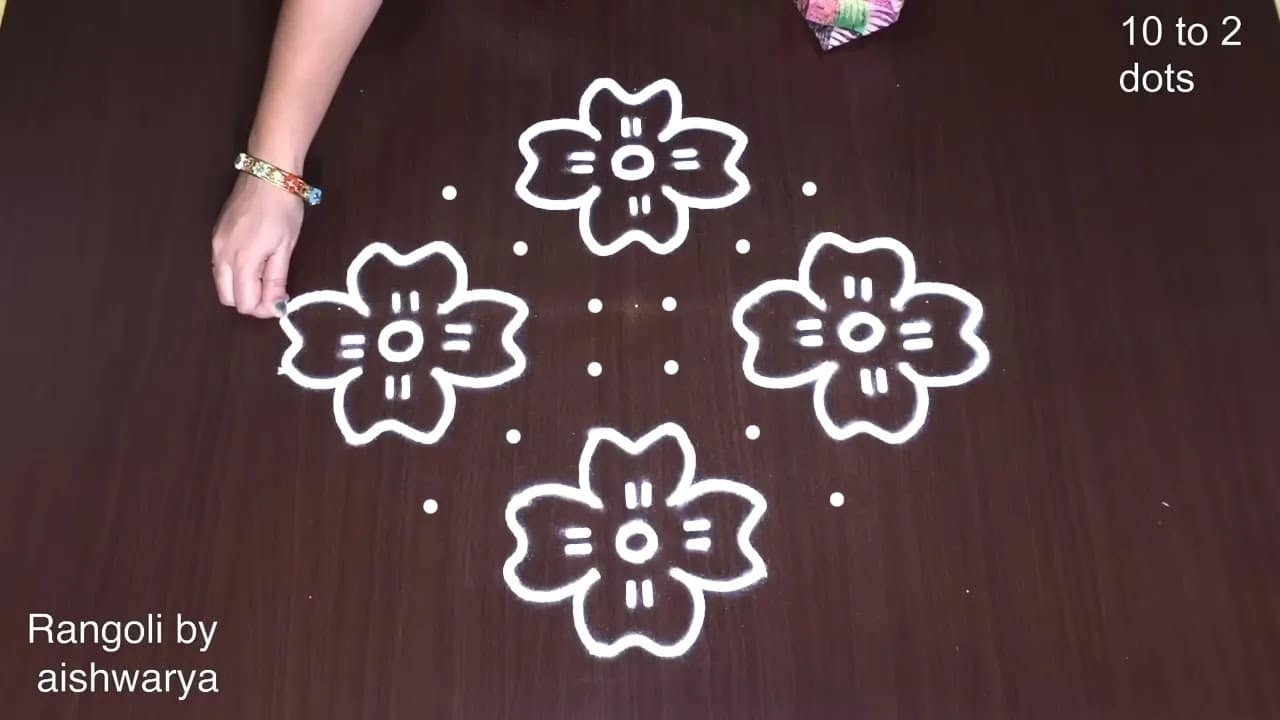
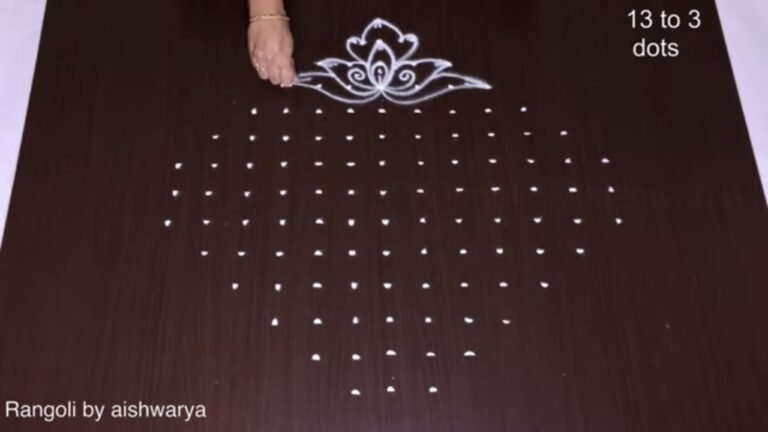
- Set out the dot grid the photo labels 10 to 2 dots. The dots still visible in the finished kolam sit on a diamond, so use the tapering diamond grid: widest across the middle, each row shorter than the last until only two dots remain at the top and at the bottom.
- Leave the block of dots in the middle completely bare. This design has nothing at all in the centre, and the finished kolam shows those plain dots surrounded by empty floor.
- Draw the first flower over the dots at the top of the grid: six broad rounded petals radiating from one centre, two aiming up, one to each side, two aiming down, with a small notch dipping in wherever two neighbouring petals meet.
- At the middle of that flower draw a small ring, a little circle with an open hole in it.
- Around the ring add four groups of three short strokes: three upright strokes above the ring, three upright strokes below it, three level strokes to its left and three level strokes to its right.
- Repeat the identical flower three more times, at the bottom of the grid and at the left and the right, so the four flowers sit around the bare centre like the four arms of a plus sign.
- Keep all four flowers the same size and the same way up. None of them is rotated to face the centre, so every flower has its notch at the top and its upright strokes above and below the ring.
- The photo shows the flowers in plain white powder; fill the petals and the ring in your chosen colours if you want a coloured version.
What You Will Learn
- Simple 10-2 Dots Rangoli
- 10-2 Dotted Rangoli
- 10-2 Dots Rangoli
- 10-2 Rangoli
- 10 Dots Rangoli Easy
- Rangoli Designs 10 To 2
Frequently Asked Questions
How do I draw this rangoli?
The grid comes first. Use a soft chalk to dot the surface, count twice to confirm the spacing, then start connecting them following the video. Work from the centre outward.
Is this suitable for beginners?
Yes — this design is shaped specifically with newcomers in mind. The dot grid is small enough to manage, and the curves are gentle. Most learners get it right by the second try.
What materials do I need?
Rice flour, coloured rangoli powders, and a clean stretch of floor or paper. Some draw with chalk first to set the grid before powdering over it.
How long does it take?
About 3 min 44 sec on screen, perhaps 15 minutes for a relaxed first attempt. By the second try most people are noticeably quicker.
Practice this design a few times and you will find your own variations emerging. That is half the joy of kolam — every artist leaves a fingerprint on the pattern.

Leave a Reply