New Flower Rangoli Kolam is the kind of design that looks intricate but is genuinely beginner-friendly once you follow the dot grid.
For another beginner-friendly variation, try Rose Flower Rangoli With 9x5dots For Pongal.
Learn more about the tradition of Rangoli on Wikipedia.
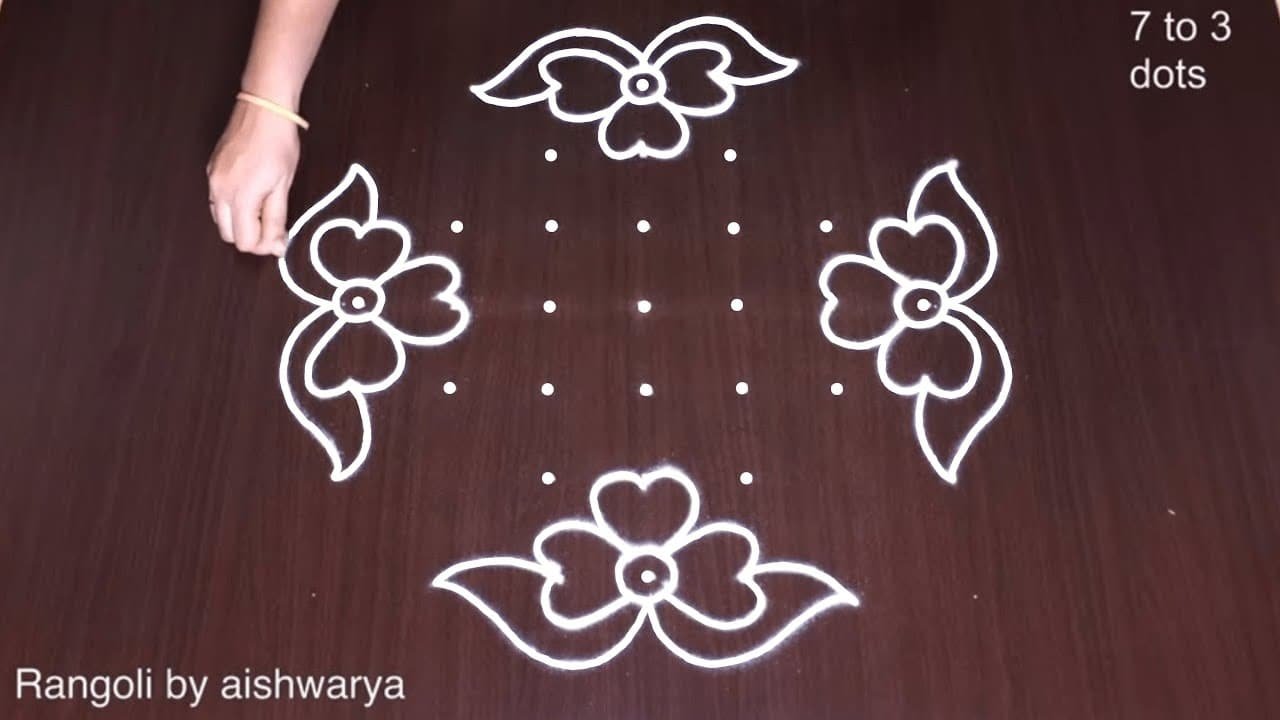
Looking for a neat and festive 7x3x3 dots rangoli for New Year decoration? This simple and elegant dot kolam is perfect for beginners and small entrances. In this video, I guide you step by step to create a balanced simple rangoli dots designs pattern using a 7×3×3 structure. If you love traditional layouts, this design fits beautifully under traditional muggulu patterns while still being easy to recreate.
We begin by placing the dots clearly to form a structured base. Then smooth curves are developed gradually, transforming the grid into a floral layout inspired by flower kolam patterns simple styles. This method makes it ideal for anyone searching for simple easy chukki rangoli tutorials. How to construct a proper 7×3×3 dot grid How to create balanced dotted simple rangoli designs
How to refine curves in easy simple chukkala muggulu designs How to draw neat muggulu simple designs with dots This design is perfect as simple chukki rangoli for new year and works beautifully for festive mornings. If you prefer compact patterns, this also fits under chukkala muggulu simple designs and chukkala muggulu easy designs for apartment entrances.
The structured dot placement makes it one of the most beginner-friendly simple and easy rangoli dots layouts. You can even enhance it into colourful new year chukkala muggulu simple designs by adding shading and detailing. Watch till the end to see how a small dot grid transforms into a graceful and symmetrical kolam suitable for celebration and traditional decoration. If you enjoy compact dot layouts, explore more simple chukkala muggulu designs with dots and creative rangoli tutorials on the channel.
Tip: Practice on paper first if you are new to dot kolam. The grid is the same; only the surface changes.
About this design: New Flower Rangoli Kolam is a beginner-friendly pattern that comes together in just a few minutes. Once you have practised the new flower rangoli kolam dot grid, you can scale it up for festival mornings or scale it down for a daily doorstep. Many learners on our channel make this new flower rangoli kolam their go-to design once they get the rhythm of the curves.
New Flower Rangoli Kolam — Step by Step Guide
Here is how to draw it, line by line. Take your time on the corners and the symmetry will take care of itself.
- Mark the 7-to-3 dot grid — 7 dots across the centre row, tapering to 3 at the top and bottom.
- On the four centre dots, draw the central flower: six rounded petals around a dotted centre.
- At each of the four corners of the grid, draw another flower of the same kind — rounded petals around a dotted centre.
- Give every corner flower a cross-hatched (net-filled) triangular skirt on its outer side, pointing away from the centre and anchored to the edge dots.
- Join the central flower to the four corner flowers with S-shaped scrolls that loop around the dots in between.
- Tuck a small curl or bud into each remaining gap so the grid fills symmetrically.
- Outline everything in white, then colour the petals and hatch the skirts.
What You Will Learn
- 7X3X3 Dots Rangoli
- Flower Kolam Patterns Simple
- Simple Chukki Rangoli For New Year
- Simple Easy Chukki Rangoli
- Simple Rangoli Dots Designs
- Traditional Muggulu Patterns
Frequently Asked Questions
How do I draw this rangoli?
The grid comes first. Use a soft chalk to dot the surface, count twice to confirm the spacing, then start connecting them following the video. Work from the centre outward.
Is this suitable for beginners?
Yes, and it is one we recommend to first-timers. The small grid keeps the design manageable while still teaching the core technique.
What materials do I need?
Just three things: powder (white plus any colours you want), a flat dry surface, and a few minutes of focus. A small bowl per colour helps keep things tidy.
How long does it take?
The tutorial is 5 min 5 sec long. With practice the actual drawing settles around 10 minutes; the first time will likely take twice that.
There is real pleasure in finishing a kolam at your own doorstep — even more so when the pattern is one you have practised before. Make this one of those.


Leave a Reply