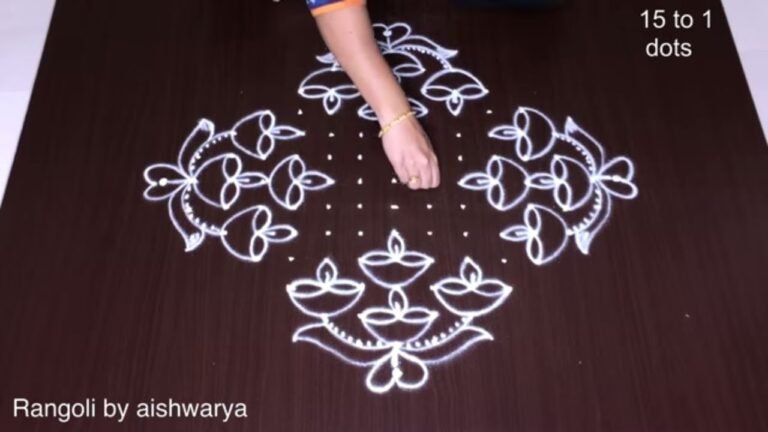
Big Muggulu For Pongal is the kind of design that looks intricate but is genuinely beginner-friendly once you follow the dot grid.

First prize winning beautiful rose rangoli 17-9 | Big muggulu for pongal competition Thank you so much for watching Channel
My Rangoli Channel Contains : Rangoli Designs Sankranthi Muggulu
Diwali Rangoli Ratham Muggulu Kolam Designs
Muggulu Designs Chukkala Muggulu Easy Rangoli
Simple Rangoli Easy Rangoli Designs Dhanurmasam Muggulu
Melikala Muggulu Geethala Muggulu Sivarathri Muggulu
Tip: Use chalk to lightly mark your dot grid first — it wipes away cleanly once your rangoli is finished.
This big muggulu design is a stunning showcase for the Pongal festival, embodying the spirit of celebration with its intricate patterns and vibrant colors. Typically featuring a dot count of 21 to 11, this traditional kolam reflects the joy and abundance associated with the harvest season. The use of organic motifs, such as flowers and pots, not only beautifies the entrance of homes but also invites prosperity and good fortune. For a simpler yet charming design, consider trying the Easy Pongal Pot Kolam.
Participating in a Pongal competition with this big muggulu can be a delightful way to engage with the community and showcase your artistic skills. The design’s complexity allows for personal expression, where beginners and experienced artists alike can experiment with colors and patterns. Additionally, you can explore other festive designs like the Pongal Panaai Kolam Designs for more inspiration. For those interested in learning about the broader art form of rangoli, you can find more information on Wikipedia.
About this design: Big Muggulu For Pongal is a beginner-friendly pattern that comes together in just a few minutes. Once you have practised the big muggulu for pongal dot grid, you can scale it up for festival mornings or scale it down for a daily doorstep. Many learners on our channel make this big muggulu for pongal their go-to design once they get the rhythm of the curves.
Big Muggulu For Pongal — Step by Step Guide
If you have drawn dot rangoli before, this will feel familiar. If you have not, the dot grid will guide you.
- Mark the 17-to-9 dot grid: a large diamond with 17 dots across the centre row down to 9 at the tips.
- Draw a six-pointed star at the centre and set a small six-petal flower inside it.
- Weave an interlocking looped band (sikku knot loops) around the star, letting the loops interlace at each star point.
- Around that band draw six large spiral roses, one coiling outward at each point.
- Fill between the roses with pairs of pointed leaves.
- Add small curls and dots in the outer gaps to close the design into a big circular muggulu.
- Keep it plain white for the competition finish.
What You Will Learn
- Simple Rangoli Designs
- Rangoli
- Muggulu
- Rangoli Designs
- Rangoli Kolam
- Kolam
Frequently Asked Questions
How do I draw this rangoli?
Begin with the dot grid — this is the skeleton of the design. With rice flour or chalk, place each dot at equal intervals. Then trace the curves slowly, one section at a time.
Is this suitable for beginners?
Beginner-friendly is exactly the right description. The video walks through every line clearly and you can match the pace.
What materials do I need?
Powder (white for outlines, colours for filling), a flat surface, and a dot stencil if you want absolute precision. Beyond that, just your hand and a steady pace.
How long does it take?
Plan for roughly 6 min 1 sec to watch and 15 minutes to draw. The second attempt is always cleaner than the first — that is the nature of dot kolam.
Drawing kolam is as much about the practice as the result. Set aside ten minutes, follow the video, and enjoy the process.
Leave a Reply