Beautiful Dussehra Easy Rangoli combines tradition with simplicity, making it one of the most rewarding designs to practice at home.
Beautiful Dussehra Easy Rangoli Creative | 9 to 9 Dots Kolam Daily Muggulu Designs | RamRangoli Thank you so much for watching Channel
My Ram Rangoli Channel Contains : Rangoli Designs Sankranthi Muggulu
Diwali Rangoli Ratham Muggulu Kolam Designs
Muggulu Designs Chukkala Muggulu Easy Rangoli
Simple Rangoli Easy Rangoli Designs Dhanurmasam Muggulu
Melikala Muggulu Geethala Muggulu Sivarathri Muggulu
Tip: Practice on paper first if you are new to dot kolam. The grid is the same; only the surface changes.
This beautiful Dussehra easy rangoli design features a simple yet captivating pattern, ideal for the festive occasion. With a dot count of 9 to 9, this kolam is easy to create, making it perfect for beginners who want to add a touch of artistry to their celebrations. The vibrant colors used in the design symbolize joy and prosperity, resonating with the spirit of Dussehra. For more inspiration, you might also enjoy exploring Unique Doorstep Kolams 8×8 and Every Day Morning Rangoli.
As you create this rangoli, consider the significance of Dussehra, which celebrates the victory of good over evil. Incorporating elements that reflect this theme can enhance the overall impact of your design. The technique used here allows for easy modifications, enabling you to personalize the pattern to suit your taste. For a deeper understanding of the art form, you can visit Rangoli on Wikipedia, where you’ll find a wealth of information about its history and cultural significance.
Beautiful Dussehra Easy Rangoli — Step by Step Guide
Follow the steps below to recreate this design at home. Pause the video whenever you need — there is no hurry.
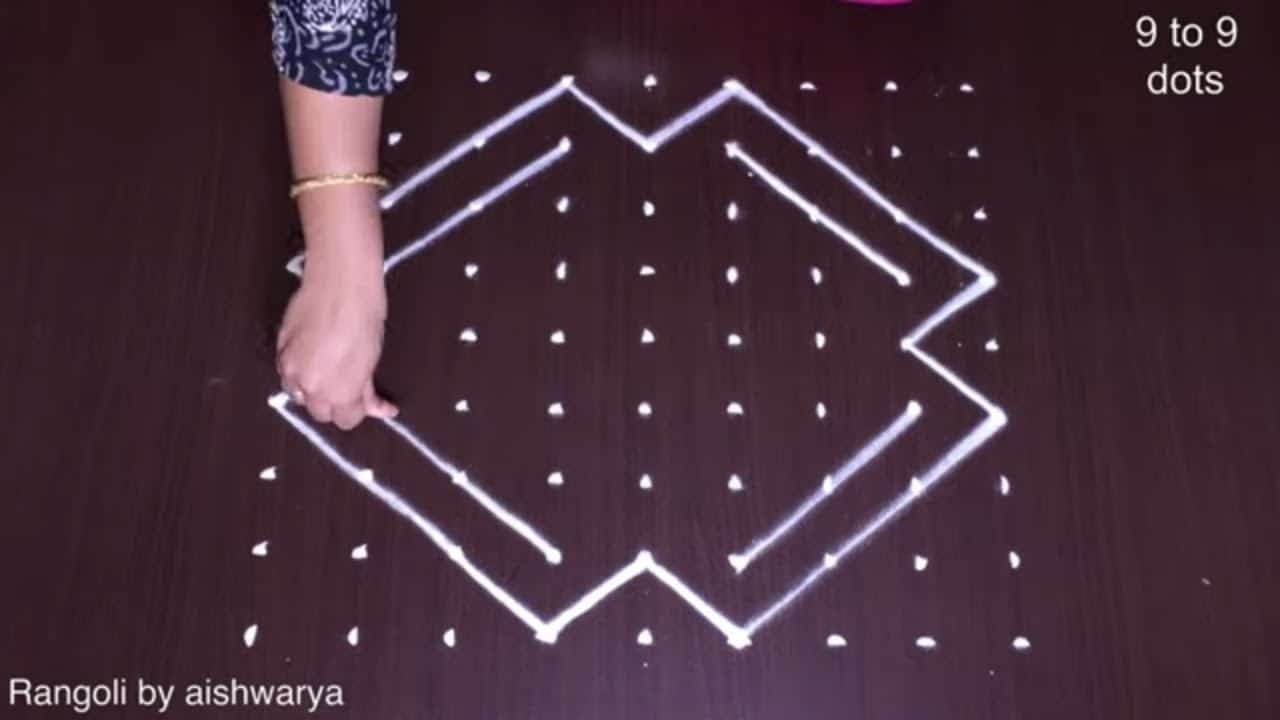
- Mark the 9-to-9 dot grid (9 rows of 9 evenly-spaced dots).
- In the centre draw an eight-pointed star flower: eight equal pointed petals radiating from the middle so their tips form a star, with a smaller star nested inside.
- Frame the star with a diamond: join the mid dots into a square stood on its corner, then draw a second, larger diamond around it with a stepped, zig-zag (notched) edge so the two run parallel.
- At each of the four outer corners of the grid draw a small square standing on its corner.
- Add a small diya (teardrop lamp with a pointed flame) at the top-centre and bottom-centre, pointing outward.
- Go over all lines evenly in white to finish the outline design.
What You Will Learn
- Simple Rangoli Designs
- Rangoli
- Muggulu
- Rangoli Designs
- Rangoli Kolam
- Kolam
Frequently Asked Questions
How do I draw this rangoli?
Begin with the dot grid — this is the skeleton of the design. With rice flour or chalk, place each dot at equal intervals. Then trace the curves slowly, one section at a time.
Is this suitable for beginners?
Absolutely. You can pause and rewind the video at every step. The pattern is straightforward once you have the grid down.
What materials do I need?
White rice flour for the outline, coloured powders for the fill, and a clean dry floor. That is the essentials list — you can add a stencil if you prefer.
How long does it take?
The video clocks in at 2 min 38 sec. Allow about quarter of an hour to draw the design at a comfortable pace.
Beginners often ask which design to start with. Honestly, this one. It is small enough to finish in a sitting and the curves teach you the basics of dot kolam.


Leave a Reply