Drawing Very Simple Diya Kolam is a relaxing, almost meditative practice. The dots guide your hand and the design unfolds naturally.
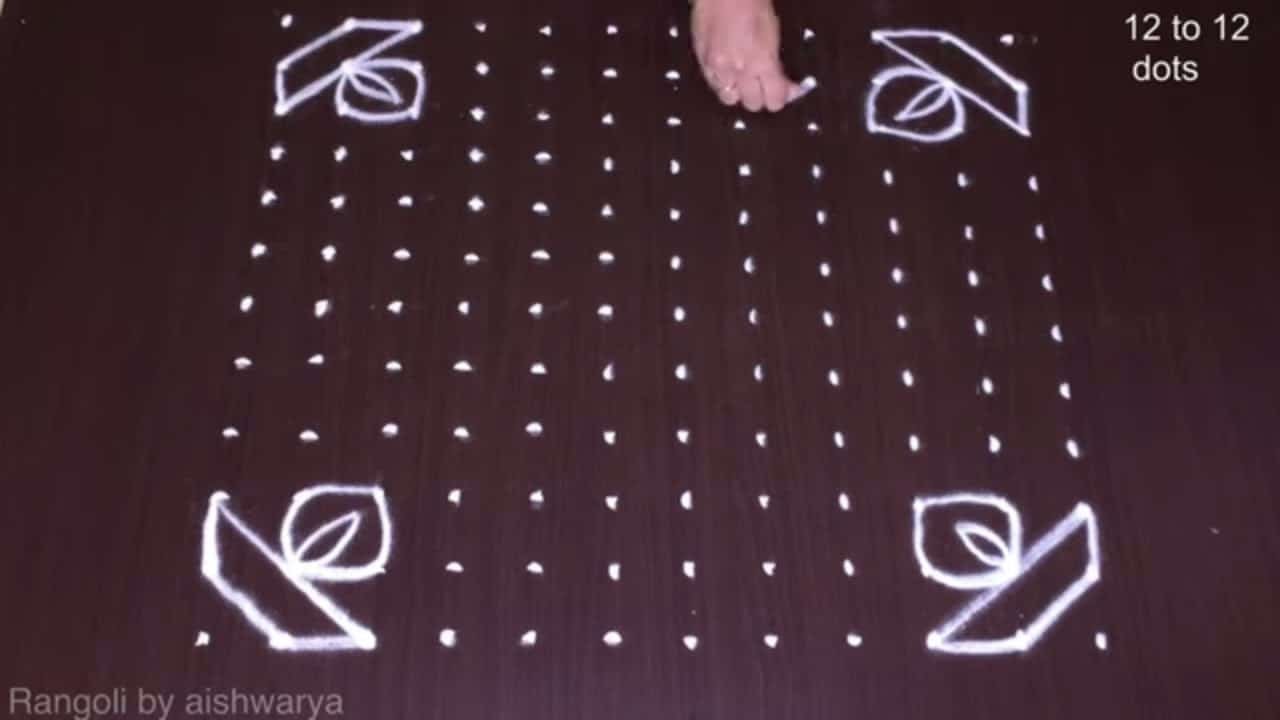
Very simple diya kolam rangoli designs | Small deepam muggulu rangoli with 12×12 dots Thank you so much for watching Channel
My Rangoli Channel Contains : Rangoli Designs Sankranthi Muggulu
Diwali Rangoli Ratham Muggulu Kolam Designs
Muggulu Designs Chukkala Muggulu Easy Rangoli
Simple Rangoli Easy Rangoli Designs Dhanurmasam Muggulu
Melikala Muggulu Geethala Muggulu Sivarathri Muggulu
Tip: Practice on paper first if you are new to dot kolam. The grid is the same; only the surface changes.
The very simple diya kolam is a charming design commonly created during the Diwali festival, featuring a grid of 12×12 dots. This kolam often symbolizes the light of diyas, reflecting the joy and warmth associated with the festival of lights. Its straightforward pattern makes it an excellent choice for beginners looking to add a festive touch to their homes. If you’re interested in other Diwali designs, you might also enjoy exploring Diwali Festival Muggulu Rangoli.
<pCreating this small deepam muggulu allows for a delightful expression of creativity, using simple strokes to outline the diya shapes and embellish them with colorful powders. The design not only enhances the entrance of a home but also invites positive energy and blessings. For those who appreciate easy-to-make patterns, similar simplicity can be found in the Daily Simple Small Rangoli 6x2x2dots Kolam. To learn more about the rich tradition of rangoli, visit this informative page.
About this design: Very Simple Diya Kolam is a beginner-friendly pattern that comes together in just a few minutes. Once you have practised the very simple diya kolam dot grid, you can scale it up for festival mornings or scale it down for a daily doorstep. Many learners on our channel make this very simple diya kolam their go-to design once they get the rhythm of the curves.
Very Simple Diya Kolam — Step by Step Guide
These steps are written for absolute beginners. Watch once, draw once, then watch again — that is how the pattern locks in.
- Mark a 12 to 12 dot grid — twelve rows of twelve evenly spaced dots — and think of it as sixteen 3 x 3 blocks, four across and four down.
- In one block draw a square with softly rounded corners taking up rather less than half the block, and inside it a pointed leaf: a lens made of two arcs meeting in sharp tips, with a single arc ruled down its middle, set on the diagonal with its tip at the square's inner corner.
- From that same corner run a long slim ribbon out across the block — two straight parallel lines about a finger-width apart — travelling on the diagonal, then bending at a right angle and closing with a short cap.
- Repeat that square-leaf-and-ribbon unit in all sixteen blocks, mirroring it left to right about the middle of the field and top to bottom as well, so the whole pattern is symmetric about both centre lines and the leaf-squares face inward.
- Where the four central blocks meet, let the inner ends of their four ribbons hook around one another: each turns a right angle in the same rotational direction, locking into a small square pinwheel at the exact centre.
- Drop a small standalone pointed leaf — the same lens shape, with no square around it — into each empty diamond-shaped gap left between neighbouring units.
- Finish the outer corners of the field with a small tight spiral curl tucked against the end of the last ribbon.
What You Will Learn
- 12X12 Dots Rangoli
- Diya Kolam With Dots
- Deepam Muggulu Designs
- 12X12 Dots Kolam
- Small Rangoli With Dots
- Rangoli With Dots
Frequently Asked Questions
How do I draw this rangoli?
It looks complex but follows a simple rhythm: dots first, then loops. Mark the grid, take a breath, and trace the curves at a steady pace. The pattern emerges on its own.
Is this suitable for beginners?
It is one of the more forgiving designs in our collection. Beginners often pick it as a confidence-builder before moving on to larger grids.
What materials do I need?
Just three things: powder (white plus any colours you want), a flat dry surface, and a few minutes of focus. A small bowl per colour helps keep things tidy.
How long does it take?
Roughly 4 min 4 sec to watch end-to-end, and 10–20 minutes to draw yourself depending on grid size and how careful you are with the curves.
Whenever you finish your version, share a photo with us. Seeing your work is the best part of running this channel.
Leave a Reply